Beyond the Piers: 5 "Gate-Kept" Coastal Spots for Fine-Art Landscape Photos in Southern California
If you search for "Southern California coastal photography," you are going to get hit with ten thousand identical photos of the Santa Monica Pier or Huntington Beach. While those iconic sandy landmarks are great for postcards, they present a massive creative ceiling for an intermediate photographer looking to create compelling, long-exposure fine art. True coastal drama requires geology—jagged rocks, receding shelf lines, dynamic tide pools, and crashing whitewater.
To break out of that creative rut, you have to escape the flat tourist hubs and head toward the rocky peninsulas and rugged bluffs of our coast. After over a decade of mapping the shifts of the local marine layer and tide pools, I’ve broken down five of my favorite coastal regions for landscape photography, along with the technical hurdles you need to conquer to shoot them like a pro.

1. The Rugged Cliffs of Palos Verdes
The Palos Verdes Peninsula is the crown jewel of dramatic rock formations in LA County. Characterized by towering shale bluffs, steep switchback trails, and massive boulder fields, this region offers an absolute masterclass in geometric composition.
The Artistic Rationale: The jagged, black rock shelves and sweeping crescent bays allow you to play with strong foreground structures, isolating sharp boulders against a silk-smooth sea using mid-range neutral density filters. The great benefit of Palos Verdes is it is shootable year-round depending on which part of the peninsula you choose. Because it has views that range from North to South, you’re sure to find a great sun angle no matter what time of the year. After a bit of exploration, you’ll know exactly which areas are best during each season.
The Technical Challenge: Elevation change and loose terrain. Reaching the best shelf compositions requires hiking down steep, unmaintained paths in most cases. A few locations have well-traveled and maintained paths to the shore, but most are challenging and require your full attention. You’ll find that getting down is tricky as most of the year the dirt is very loose and slipping and falling on your butt is possible if you’re not careful. While going down is relatively easy as you move with gravity, getting back up to the top of the cliffs is quite a workout and will allow you to skip your cardio workout for the day. Whichever path you choose, you can be sure that unless you bring someone with you, you’ll likely be shooting alone.
Tide & Shutter Strategy: All tides can be shot here, but I tend to favor high tides that showcase the power of the ocean as it crashes over the rocks. Many areas have great tide pools that are only exposed during low and extreme low tides, but they typically lack wave action due to the shallowness of the slopes just off the shore that slow the waves down. There are numerous areas to explore and everyone will have specific features that are best during specific tides. It took me many visits to understand which areas are best for certain tides.
On high-surf days: Lazy shutters from 1/15th to 0.5 seconds are fantastic to capture the raw power and motion of the waves.
On flat days: If the Pacific looks like a lake, put on your 10-Stop ND filter and take some long exposures—the longer the better!
Pro-Tip: A sturdy tripod with rubber feet swapped out for stainless steel spikes is absolutely crucial for locking down your frame on wet, sloping shale and slick polished rocks. Finding a sandy area to rest your tripod will be extremely rare so be prepared for lots of rocky shore.

2. The Sea Stacks of Malibu
Stretching along the northern edge of the LA basin, Malibu offers a stunning contrast of clean sandy beaches punctuated by massive, prehistoric sea stacks and hidden sea caves. It provides a sense of scale and raw coastal energy that is difficult to replicate anywhere else in the county.
The Artistic Rationale: The iconic towering sea stacks of El Matador create incredible natural framing opportunities. Passing the setting sun through these rock openings allows you to capture dramatic sun stars and clean, glowing reflections on the wet, receding tide sand. While the crown jewel is El Matador State Beach, it is notoriously crowded at sunset on any day of the week. For those with a sense of adventure, you’ll find many other pockets to explore along this stretch. Keep in mind that Malibu is best in the fall and winter months as most of this part of the coast is South-facing. In the summer, the sun sets far to the northwest and behind the bluffs, blocking that direct, warm golden hour light from illuminating your foreground rocks.
The Technical Challenge: Crowd management and fast-changing tides. Malibu is highly popular with tourists, fitness influencers, and portrait shooters. To get clean, fine-art frames, you need to learn how to time your shoots during moody, overcast marine layer mornings or utilize extreme long exposures to ghost out people walking through your frame. While the afternoon golden hour can feel chaotic, you’ll find that the crowds rapidly dissipate the second the sun drops below the horizon and the twilight color starts to peak. Be patient and you’ll get your clean window, or be intentional with your framing and exposure bracketing to easily clone out stray tourists in post-processing.
Tide & Shutter Strategy: Every tidal height changes the personality of this coast, providing completely different subjects. High tides generate dramatic crashing action around the classic arches and sea stacks, whereas low tides expose hidden reef networks that make incredible foreground elements. To maximize your compositions, look at the direction of the surf and time your shutter to the rhythm of the water:
Incoming Water: Lazy shutters from 1/15th to 1/5th of a second are perfect for snapping the explosive, fast-moving impact of waves hitting the stacks.
Receding Water: Extend your shutter out to 0.5 to 2 seconds to capture the painterly streaks of the water draining back down the sand slopes and around the base of the rocks.
Pro-Tip: Because Malibu is an incredibly sandy environment, always extend your bottom-most (smallest) tripod leg sections first. This keeps your twist locks or flip joints safely above the wet sand line, preventing grit from grinding into the threads and ruining your gear.
3. The Sandstone Reefs of La Jolla (San Diego)
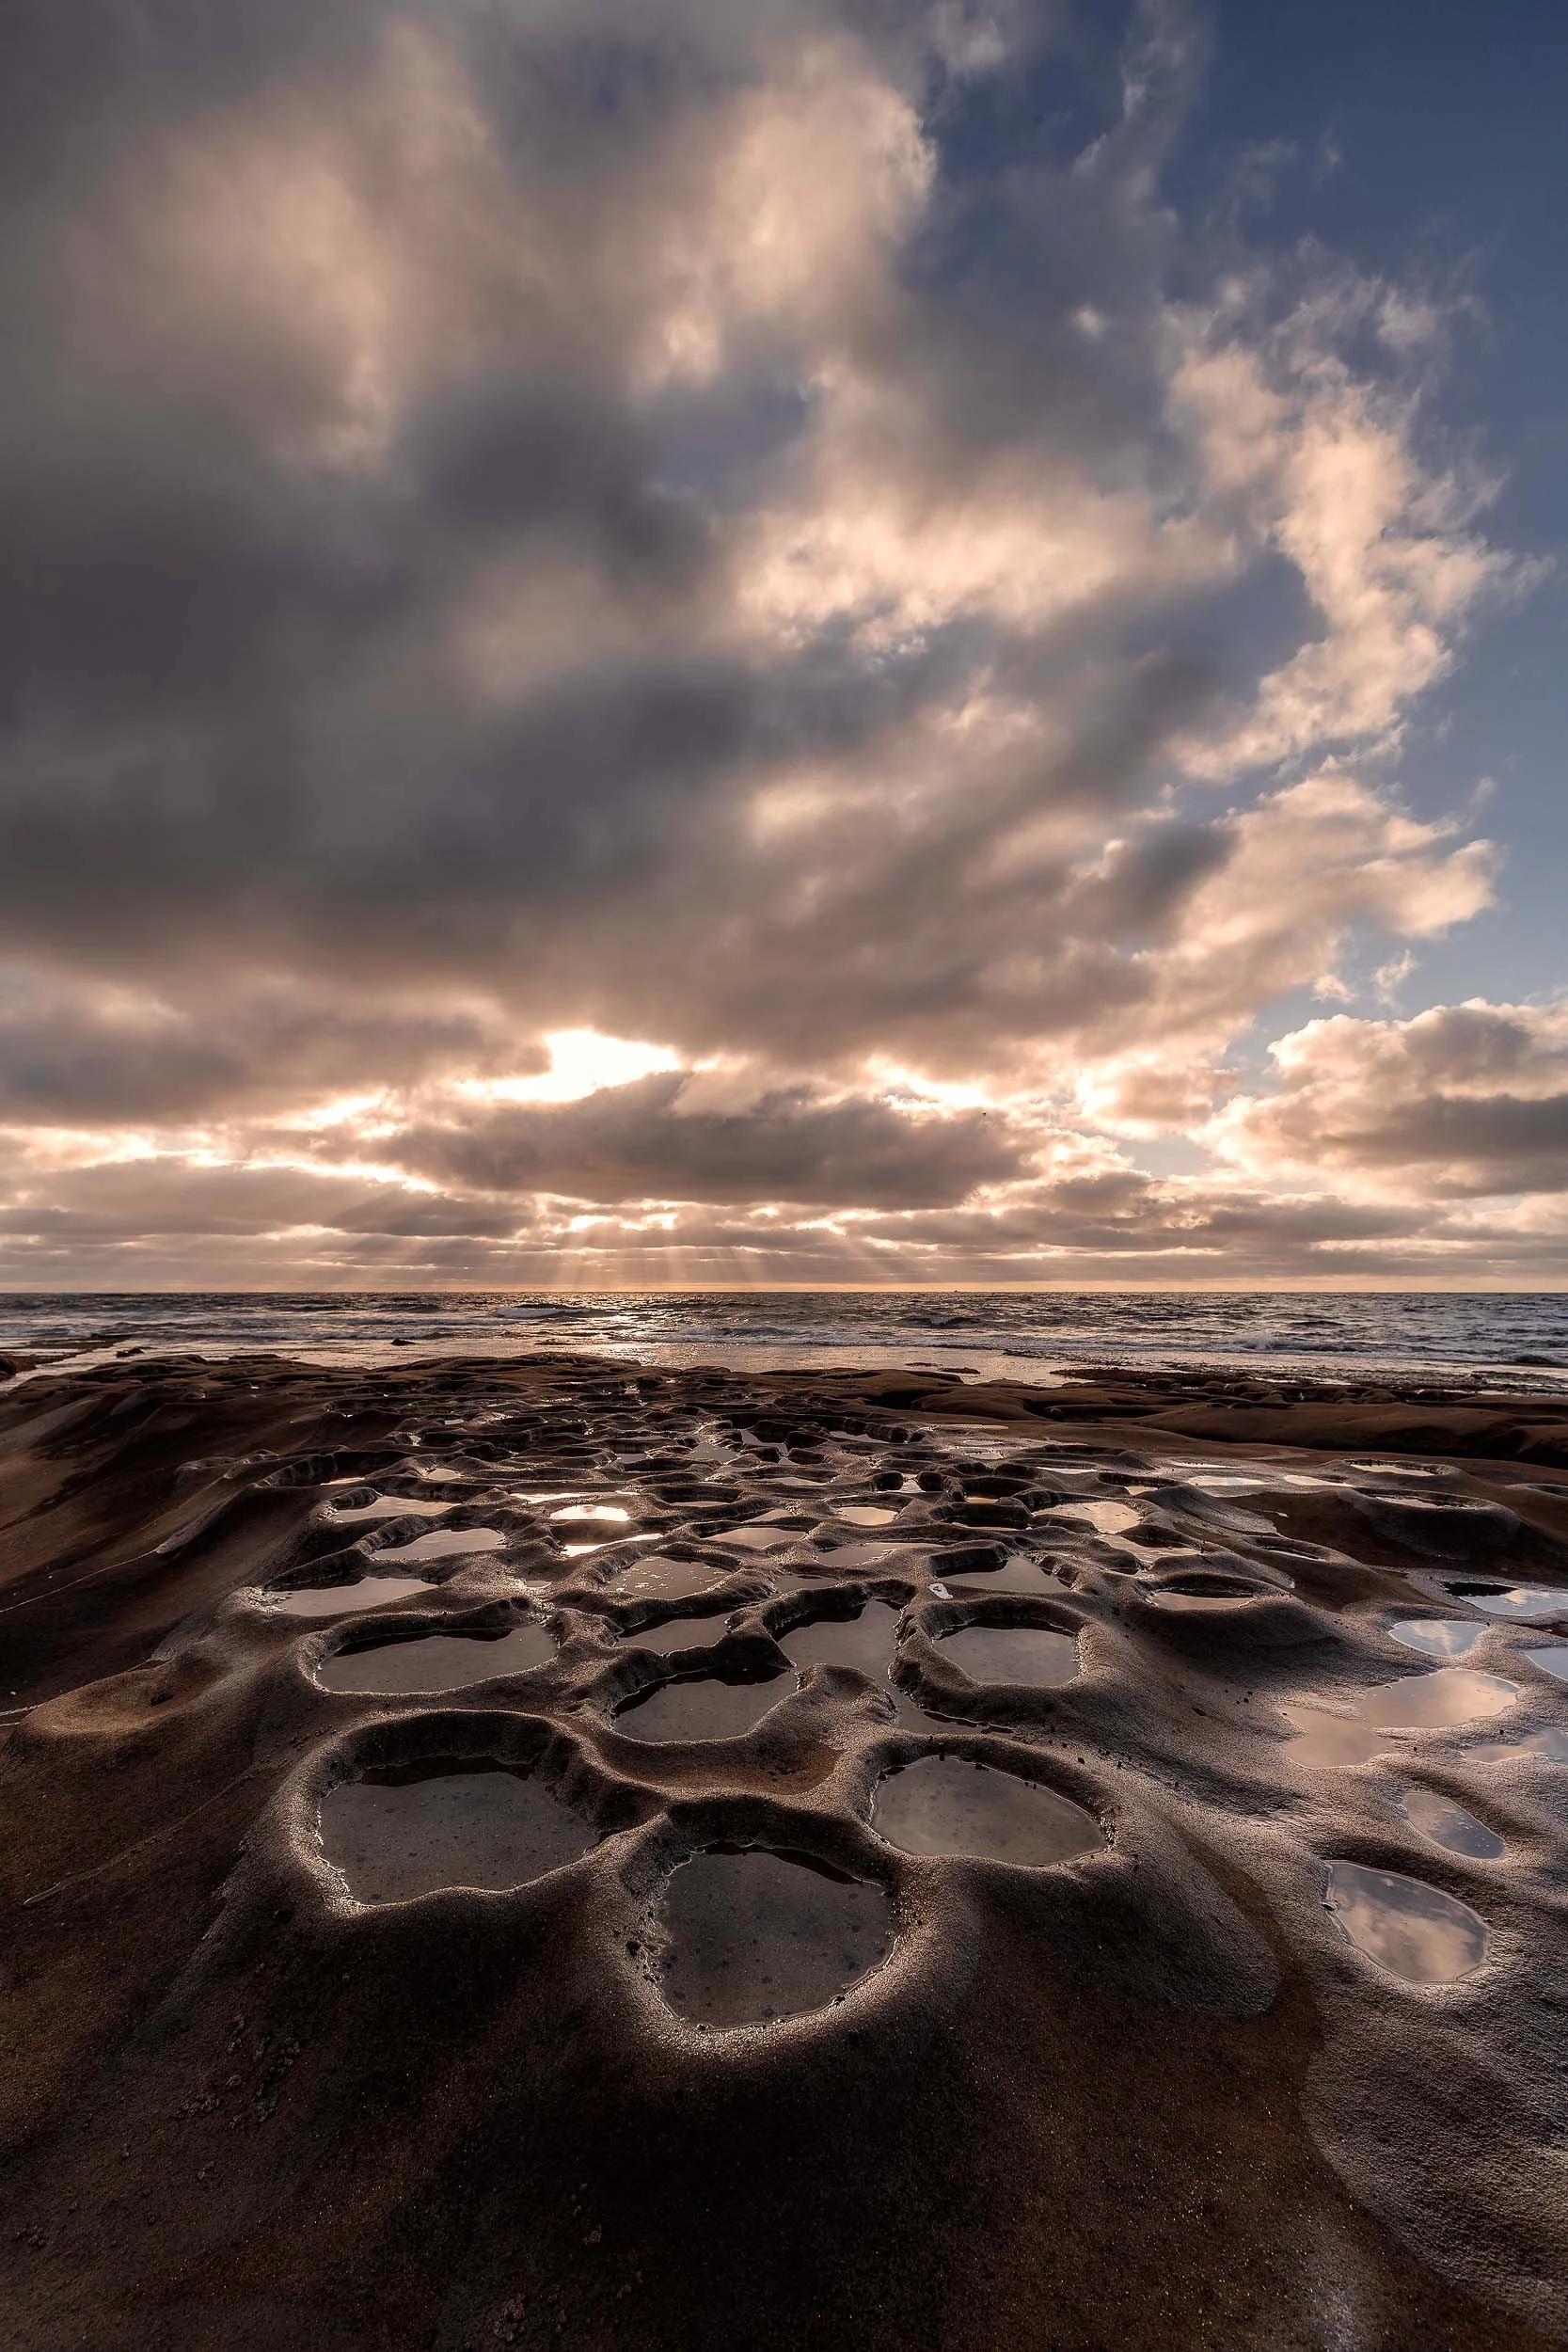
Heading down to the southern edge of the SoCal coast, the La Jolla shoreline breaks away from flat sandy beaches to offer incredible, smooth, and pockmarked sandstone shelves. Over centuries, the ocean has carved dense clusters of circular tide pools directly into the rock tables, creating an unforgettable, highly patterned foreground.
The Artistic Rationale: The true magic of this geology is how the repeating circular pools act as natural reflection traps. Instead of tracking a single leading line, you can shoot with a wide-angle lens to map out a grand perspective, catching the fiery colors or moody light of a dynamic sky trapped inside dozens of individual rock bowls. There is also an abundance of smooth shelves that provide fantastic, brief waterfall flows as the waves spill over them. Because La Jolla behaves almost like a mini-peninsula, it can be shot across multiple seasons. However, I find the winter months and a more westerly setting sun to be the absolute best window for dynamic light, heavy wave action, and dramatic clouds. The summer months typically bring a heavy marine layer and a more northerly sunset angle.
The Technical Challenge: Flat, high-contrast light and crowd management. Because these rock tables sit wide open to the sky, shooting them under a harsh sun completely flattens the texture of the intricate pools. You ideally want a sky filled with dramatic cloud breaks to give the frame mood and naturally diffuse the direct sunlight. Much like the beaches and coves of Malibu, this area is highly popular for portrait photographers, sunset watchers and other landscape photographers. Your patience will pay off if you stick around; as the sun sets, the crowds rapidly venture off toward home and dinner, leaving the best twilight light entirely to you.
Tide & Shutter Strategy: While every tidal height brings interesting treasures, you must target a mid-to-low tide window to prevent heavy incoming swells from washing out the definition of the circular formations entirely. While lower tides are best for the potholes, the smoother shelves are best served during medium to high tides. If you venture slightly further south to the famous Sunset Cliffs, higher tides provide great water action slamming against the cliffs, while extreme lower tides allow for the safe exploration of the area's many hidden sea caves.
On Heavy Surf Days: Lazy shutters from 1/15th to 1/5th of a second are perfect for snapping the momentary waterfalls slithering and draining off the smooth sandstone shelves.
On Calm Days: Utilize long exposures (10 to 30+ seconds) to stretch the water moving between the deep cracks of the sandstone tables, visually connecting the motion of the ocean to the geological smoothing of the shelves.
Pro-Tip: Always arrive early and scout the sandstone reefs on foot to locate the cleanest, most water-filled pockets before the light peaks. Always check whether the tide is incoming or receding, and map out a fluid strategy. A composition that works perfectly during golden hour might completely change once the sun sets and the water shifts. Stay flexible, keep moving, and you can easily score multiple unique compositions in a single session.

4. The Hidden Coves of Laguna Beach
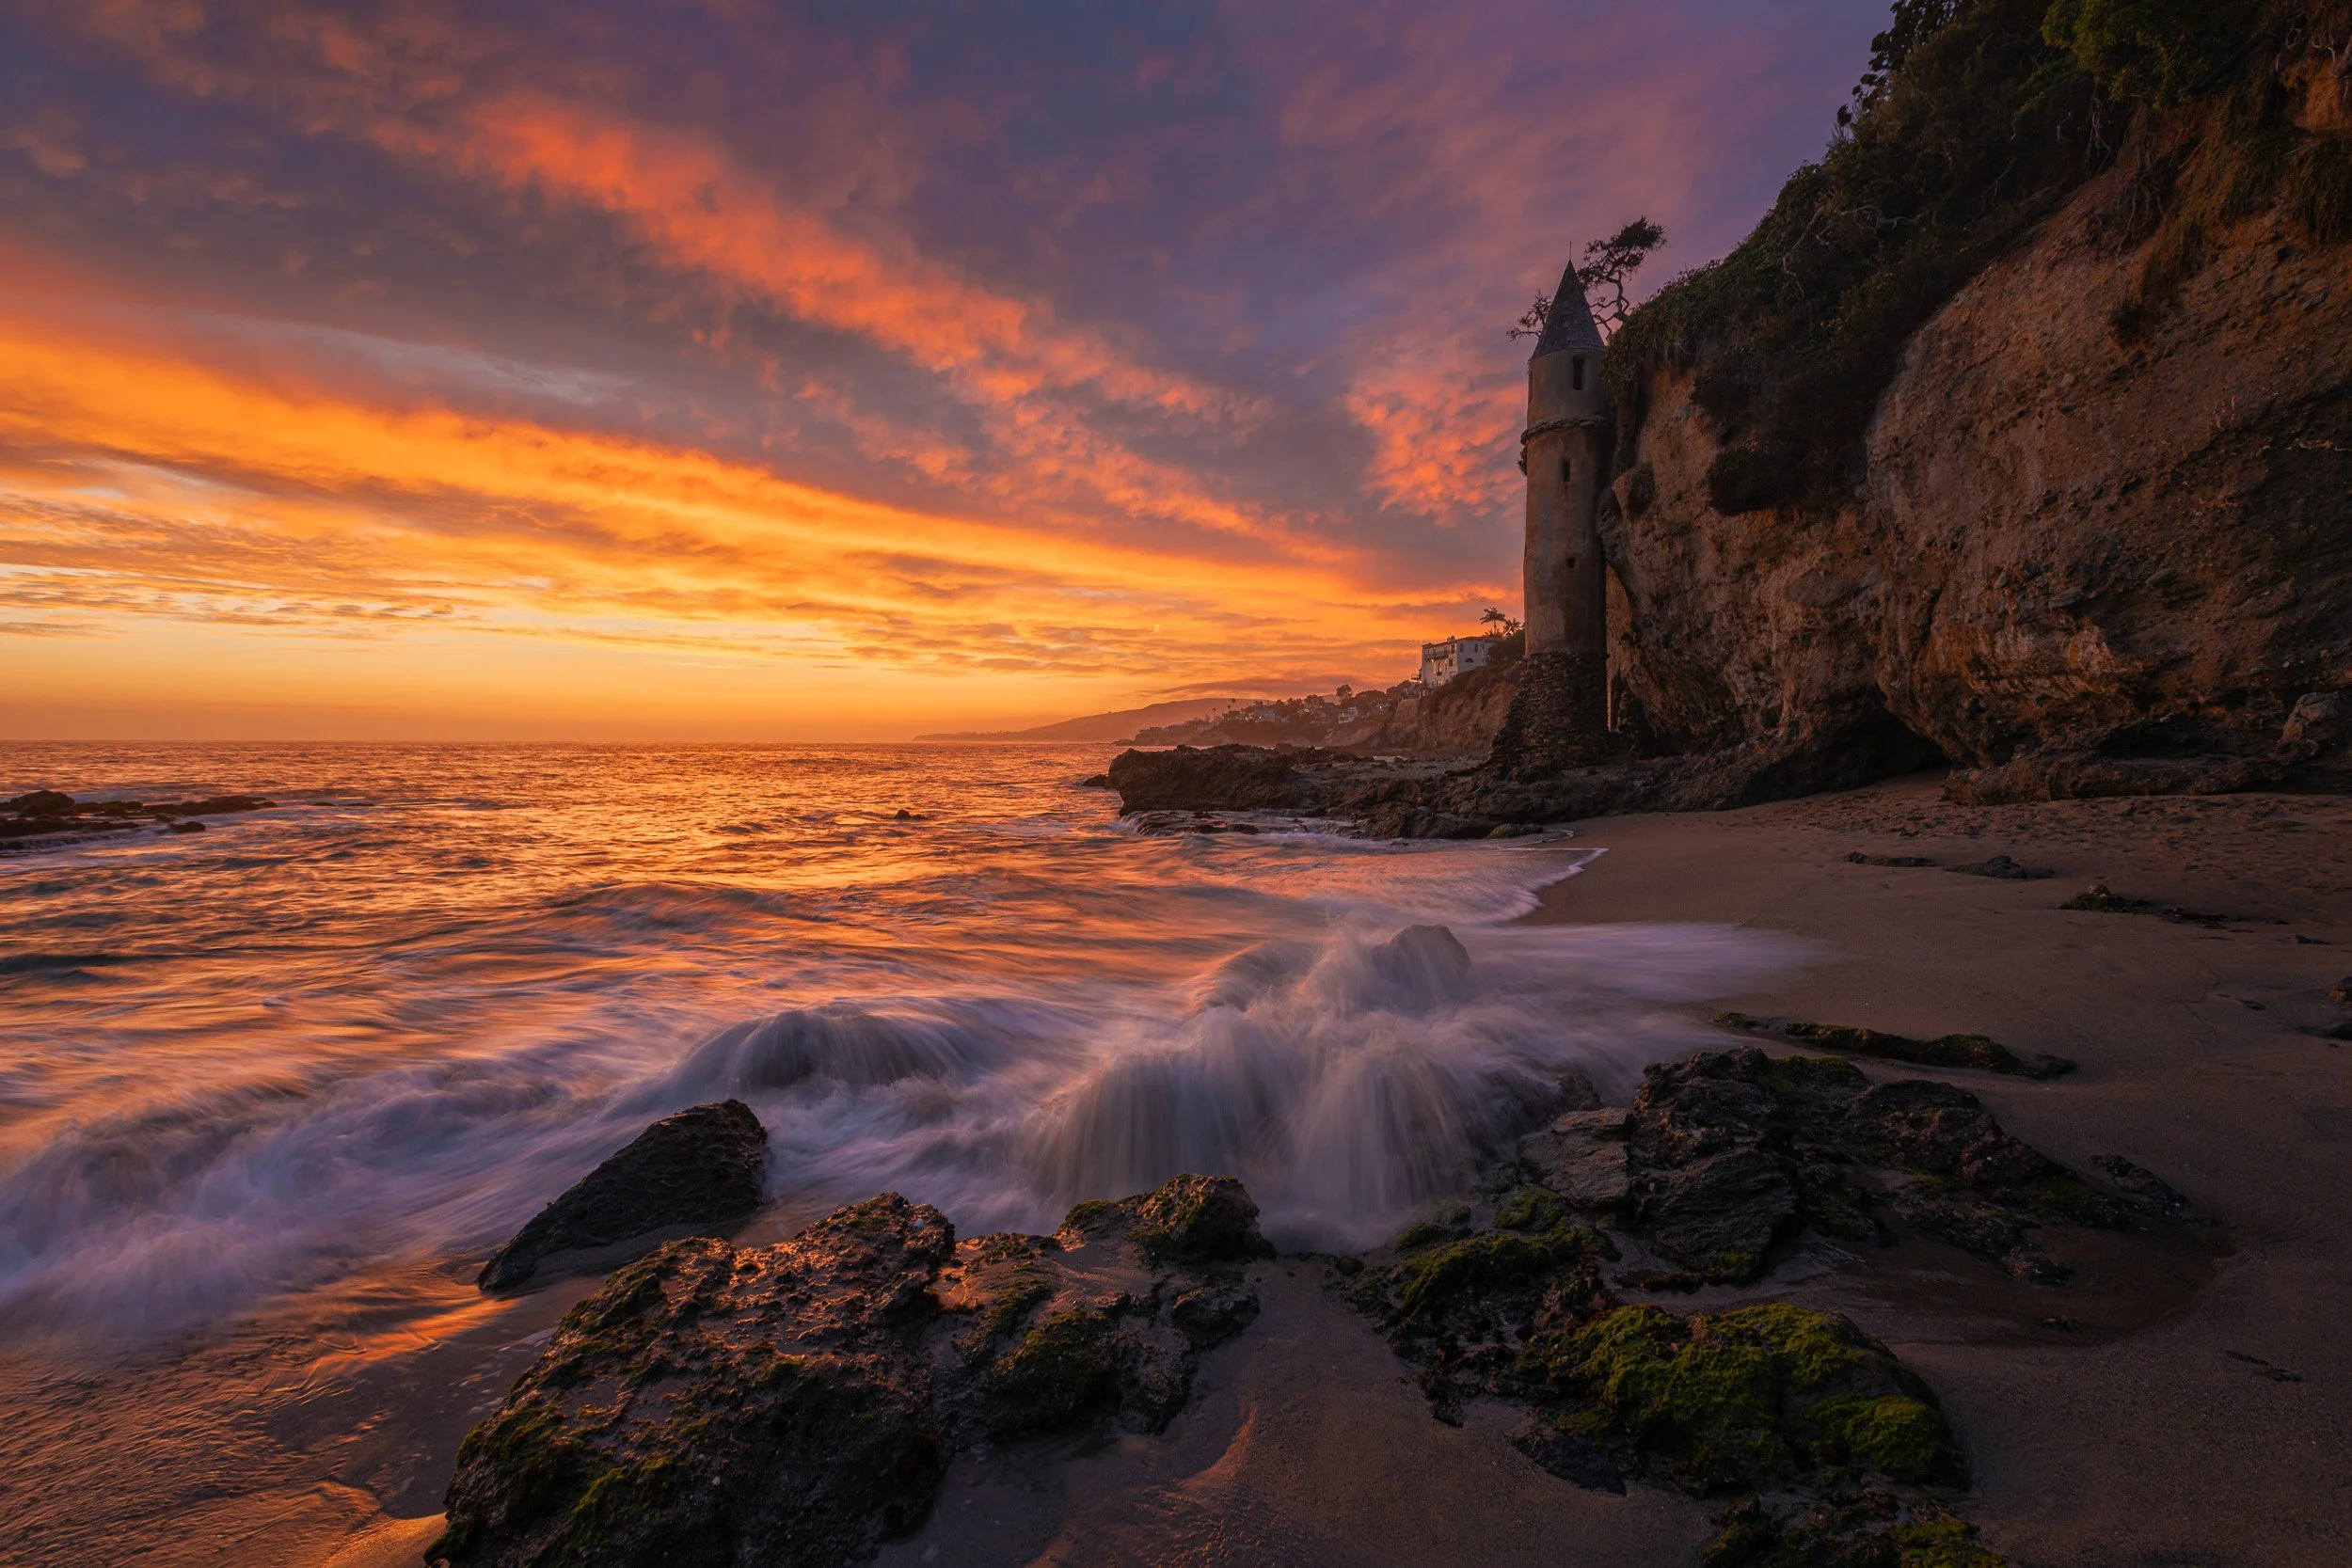
Laguna Beach switches the vibe from dark, moody shale to pristine, golden sandstone shelves, emerald water, expansive sandy beaches, and tight pocket coves. It is a visual paradise that requires highly precise timing and deep local knowledge to know exactly where to be at the right moment.
The Artistic Rationale: The sandstone structures here erode into beautiful, smooth channels and deep circular blowholes. The water clarity is phenomenal, allowing you to capture the rich texture of submerged reef systems beneath your long exposures, even during the midday light. Utilizing a circular polarizer is a game-changer here to cut through the surface reflections and peer clearly into the shallow shores. Water motion can be fantastic at the many hidden pocket beaches throughout this stretch of coast. The sea caves of Thousand Steps Beach, the iconic Victoria Beach Pirate Tower, and the rocky points of Crescent Bay are some of my personal favorites, but there are dozens of coves to explore, each possessing its own distinct features.
The Technical Challenge: You’ll find that two specific rules hold true about Laguna Beach. First, for the most part, it behaves as a winter shooting environment because the coastline is predominantly South-facing. However, like Malibu, it stretches over a massive footprint—but unlike Malibu, its Northern section faces further South than its Southern section due to a distinct geographical bend that occurs right around the downtown area. If you plan accordingly, South Laguna is best shot in the summer, and Northern Laguna is best shot in the winter. Second, most of Laguna's coves are crescent-shaped, allowing for highly varied sun angles and shooting directions depending on the season and the direction of the clouds. Knowing which compositions are optimized for different seasonal light paths or cloud movements is the ultimate key to making the most of any sunset.
Tide & Shutter Strategy: Many of Laguna’s best pocket coves completely disappear at high tide, potentially trapping you dangerously against cliff faces. You must become a master at reading tide charts, targeting dropping low-tide windows to safely access the outer reefs. Ultimately, after enough exploration, you’ll discover that every tide has its place. Personally, I love higher tides that allow the waves to crash dramatically against the formations closest to the cliff bases. Mid-to-low tides allow safe access to the outermost reefs, unveiling fantastic shelves where the ocean violently flows in, out of, and through deep channels. Some of these hidden spots are too precious to even mention on the internet, but if you have the heart of an explorer, you’ll find them eventually.
On Heavy Surf Days: Lazy shutters from 1/15th to 1/5th of a second are perfect for snapping the momentary rivers slipping in between the rocky outcrops.
On Calm Days: Utilize long exposures (10 to 30+ seconds) to stretch the water moving between the rocks utilizing the showing of time and how it crafts it’s own art in the rocks.
Pro-Tip: The changing seasons provide massive shifts in sand distribution. Some coves may be completely covered in a deep blanket of sand in the summer, and completely rocky in the winter. Scouting is incredibly important, as compositions you’ve shot before can completely disappear, while brand-new ones are suddenly uncovered. I find that heavy winter storms often strip away the massive summer sandbars and beautifully uncover these hidden rocky gems.
5. The Sculpted Formations of Corona Del Mar
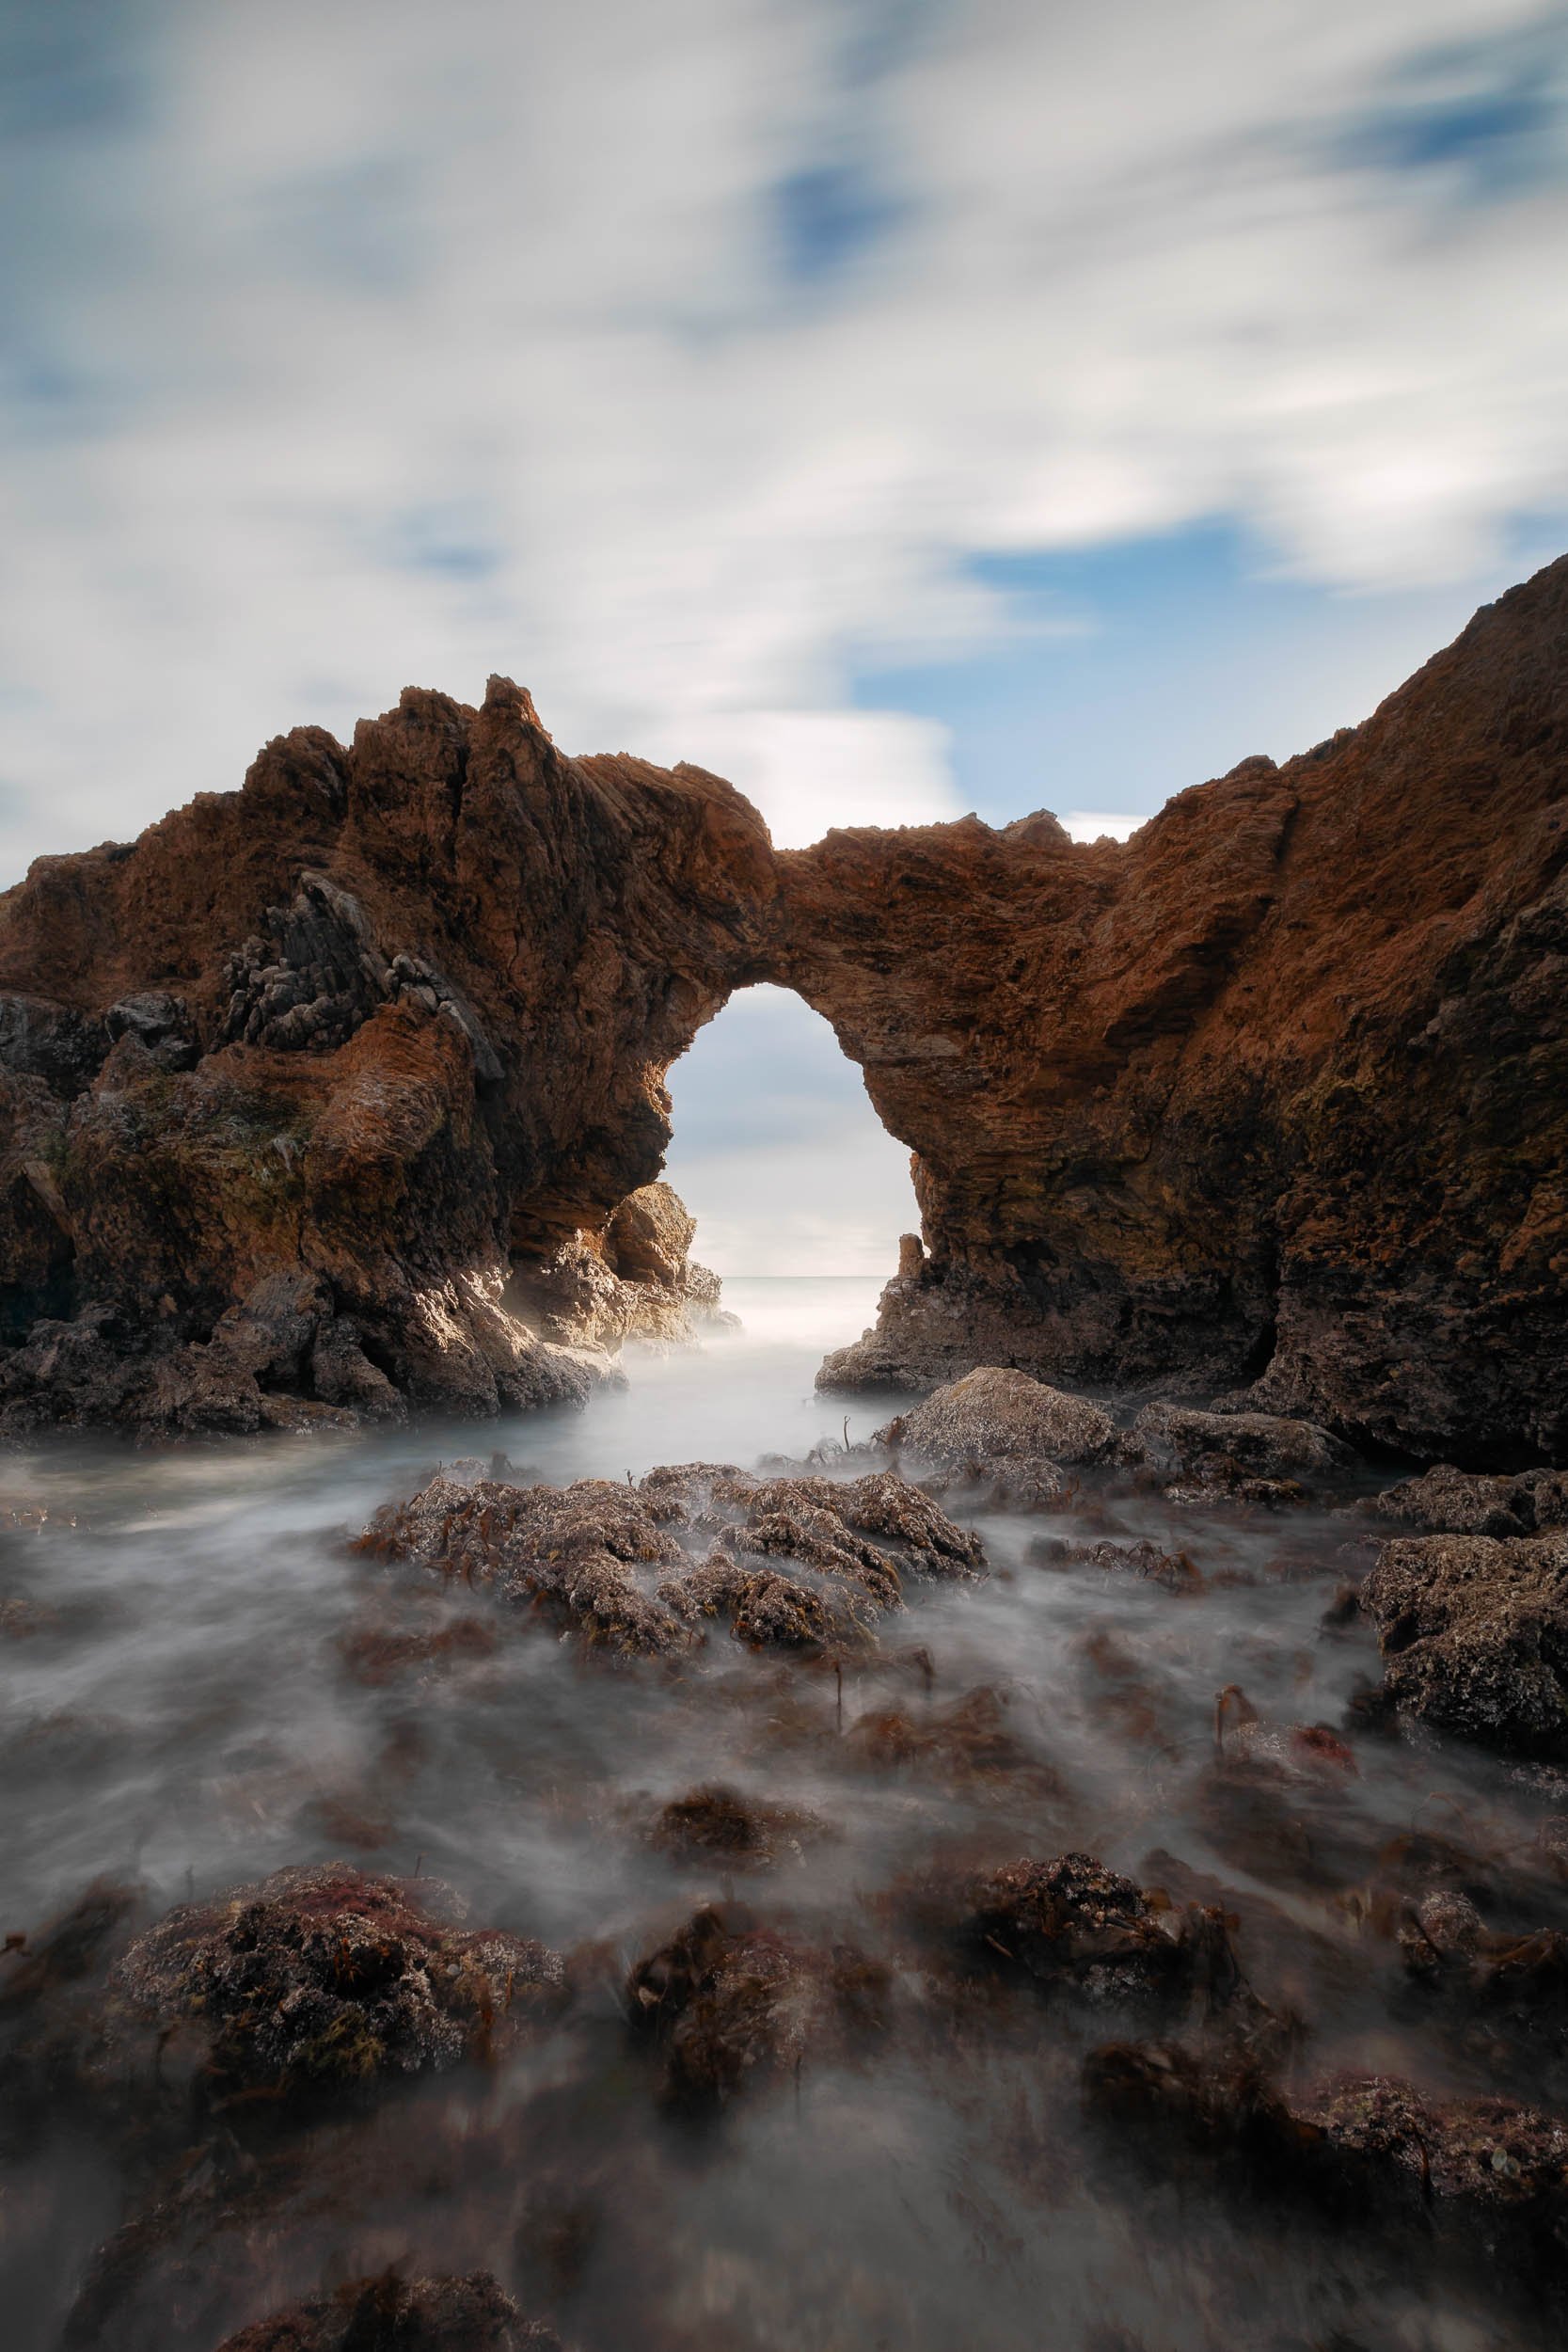
Situated right at the mouth of the Newport Harbor, Corona Del Mar features an exceptional stretch of highly unique rock formations, craggy cliffs, and low-lying reefs that intercept the incoming swells perfectly.
The Artistic Rationale: There is a wide variety of seascape shooting environments packed into this area. While the main beach is mostly sandy, the rocks begin at the south end and continue uninterrupted until you reach the northern border of Crystal Cove. The sandstone here is heavily weathered, textured, and deeply sculpted, creating abstract erosion patterns and dramatic coastal recesses. The specific example image I provided isn’t visible from any of the main beaches and requires a genuine sense of adventure to locate. It is best targeted at very low tides for ease of access, however, the rocks can be extremely slippery, so take your time and step carefully. I’ve seen many photographers slip and fall trying to get close to this arch and if you aren’t careful you could be in real trouble and a long way from help.
The Technical Challenge: Corona Del Mar is a southwesterly facing beach, much like its larger big brother, Laguna Beach. You’ll find that the winter months provide spectacular, direct sun angles for shooting this area. The mid-summer months are probably best left for other coastal regions, unless you plan to explicitly shoot side-lit rock textures. Timing is everything for this stretch of coast. Having the right sun angle and tide align perfectly is what makes a portfolio frame come together. Exploration is key here; if you want to find compelling compositions, you’ll need to venture beyond the main tourist traps and scout along the rocks for shapes that catch your eye. The further you roam, the more interesting and peaceful the shoreline becomes.
Tide & Shutter Strategy: High tides will compress your shooting options, keeping you confined to the Main Beach or the sand at Little Corona Del Mar Beach. Low tides, however, unlock the gates, allowing you to venture all the way down to the edge of Crystal Cove. Be warned: if you venture far to the south during a dropping low tide and the water begins to push back in quickly, you can easily become trapped as your return pathway gets blocked by the deep surf. Always know exactly what the tide is doing. Corona Del Mar is an incredible region for experimenting with a spectrum of shutter speeds to capture the painterly textures of water rushing back over the jagged, weathered outcrops.
On Heavy Surf Days: Lazy shutters from 1/15th to 1/5th of a second are perfect for capturing short-term wave action and spray as the sets slam into the textured rock faces.
On Calm Days: Utilize long exposures (10 to 30+ seconds) to inject mood, fog, and texture into low-tide scenes that otherwise lack dramatic wave action.
Pro-Tip: If you are exploring away from the main public access points, always ensure you bring a reliable flashlight (or headlamp) and a fully charged phone. If you ever happen to get caught by a fast-rising tide, you can use your phone’s satellite map to locate an alternate bluff trail path out or call for assistance. Furthermore, that flashlight is mandatory for navigating your way safely back across the wet boulder fields after the sunset light completely fades. Walking on these rocks in the dark takes immense patience, and you will almost always arrive back at your vehicle well after nightfall if you venture far enough.
The Common Thread: Reading the Rhythms of the Coast
If there is one unifying truth that connects the dark shale of Palos Verdes to the pockmarked sandstone of La Jolla, it’s that the Pacific Ocean refuses to be shot the same way twice. Unlike traditional mountain or desert landscapes where the topography remains static, the Southern California coast is a fluid, ever-shifting canvas. The composition you fall in love with at 5:00 PM might completely vanish beneath a high tide by 6:00 PM, or be buried under several feet of seasonal sand by next month.
Mastering fine-art coastal photography isn't about memorizing GPS coordinates or rushing from spot to spot hoping for a lucky sunset. It requires you to become a student of the environment. You have to learn to read the collaboration between the tide charts, the seasonal angles of the sun, and the fluid mechanics of the water moving across different geological structures. When you stop fighting the elements and start timing your shutter to the actual rhythm of the swells, that is the exact moment your images shift from standard postcards to compelling fine art.
Beyond reading the environment, true mastery over your shutter speed only comes from continuous experimentation with the daily conditions in front of you. While I generally find that calm days lend themselves beautifully to extreme long exposures and heavy surf days are best served by lazy shutters, those rules aren't set in stone. A high-action wave day can look absolutely spectacular stretched into a long exposure if you have dynamic cloud movement sweeping through the upper frame. Ultimately, a great sky is what anchors a long exposure composition and brings the entire scene together.
Step Behind the Lens
Knowing the geographical coordinates of a rocky shelf is only 20% of the puzzle. The real artistry of fine-art landscape photography lies in understanding the fluid mechanics of the ocean—knowing exactly when to fire the shutter to capture a sweeping backwash trail, how to dial in exposure times to match the wave speeds, and how to safely navigate the coast in the dark.
I keep both my traditional square filter systems and ultra-slim magnetic kits packed in my bag during my field workshops to show students how specific glass changes the rhythm of a fast-moving coastal shoot. If you are ready to move past generic sunset snapshots and master the advanced technical workflows of the Pacific coast, I have two ways we can work together this season:
Private 1-on-1 Coaching: Tailored entirely to your skill level and creative goals. Lock in your camera slot now before by standard rates adjust up on July 1st.
Group Masterclasses: If you prefer a collaborative atmosphere and a shared learning experience with a small group of fellow photographers, I have an exclusive session coming up in late August.
Both options are linked below for your exploration—pick the environment that fits your learning style best, and let's go shoot!
JOIN A GROUP COASTAL WORKSHOP👇
A PREMIER SOUTHERN CALIFORNIA PHOTOGRAPHY EXPERIENCE
Discover how to safely navigate changing tides, predict coastal light, and utilize professional filter systems to turn chaotic waves into striking fine art. Join fine-art landscape photographer Chris Ewen Crosby for an elite, two-part masterclass strictly capped at 6 participants per session.
Next Available Date:
August 22nd, 2026 | Orange County, CA (1 Spot Left!)
Investment: $245
Alumni Discount: Past students always save $25. Use code ALUM at checkout (Note: Active past-student status verified upon booking).
Discounts cannot be combined
*Note: After you fill out the form, click the shopping cart link in the top right corner to complete your purchase. Be sure to enter any discounts at that time!