The 3-Element Rule: How to Fix Flat, Cluttered Landscape Photos
Have you ever stood in front of an absolutely breathtaking landscape, pulled out your camera, snapped a shot, and immediately felt disappointed when you looked at the LCD screen?
In person, the scene felt grand, dramatic, and full of depth. But on screen, it looks flat, chaotic, or completely devoid of the emotion you felt standing there.
Don't worry—this isn't a problem with your camera sensor. It’s a fundamental disconnect in how humans vs. lenses see the world. As human beings, we perceive depth in three dimensions, and our eyes dynamically scan scenes, naturally filtering out visual clutter. A camera lens, on the other hand, flattens a 3D world onto a 2D plane. If you don't deliberately structure your scene, that majestic landscape turns into a wall of visual noise.
Early in my photography journey—and constantly with my workshop clients—I kept hitting the exact same wall: I’d stand in front of a grand, epic scene, snap a shot, and look down at the LCD screen only to feel completely underwhelmed. The scene felt huge in person, but the photo looked flat, cluttered, and boring.
If you want to transform "flat snapshots" into fine-art landscape images, you need a simple framework to organize the chaos. Enter The 3-Element Rule.
Step 1: Simplify the Scene into 3 Distinct Layers
Most beginner composition tutorials, including me, preach the "Rule of Thirds." While grid lines can be very helpful to help balance your scene and negative space, they don't teach you how to manage visual weight or create depth. Then there are the other 100+ rules of composition that you can find on the internet.
Instead of worrying about grid intersections and trying to memorize a plethora of photography rules, train your eyes to divide every single landscape into three distinct structural layers:
The Foreground (The Anchor): This is the bottom third of your frame. Its job is to grab the viewer’s eye and give them a physical entry point into the photo. Think textured shoreline rocks, a path, tide pools, or unique flora. I usually look for elements that are special to the area that I’m shooting. For example the cholla cactuses of Arizona, salt textures of Death Valley, water textures of the SoCal coast.
The Midground (The Subject): This is the heart of your story. It connects the foreground to the distance and holds your primary visual focus—like a dramatic sea stack, a winding river, a canyon wall, or a lone tree.
The Background/Sky (The Canvas): The top layer that establishes scale, mood, and context—such as fiery sunset clouds, distant mountain peaks, or a soft misty horizon.
Whether you are deep in a mountain canyon, standing on a rocky beach, or in a field of wildflowers, the principle stays identical. See the examples below to see how the 3-Element Rule applies across completely different environments:
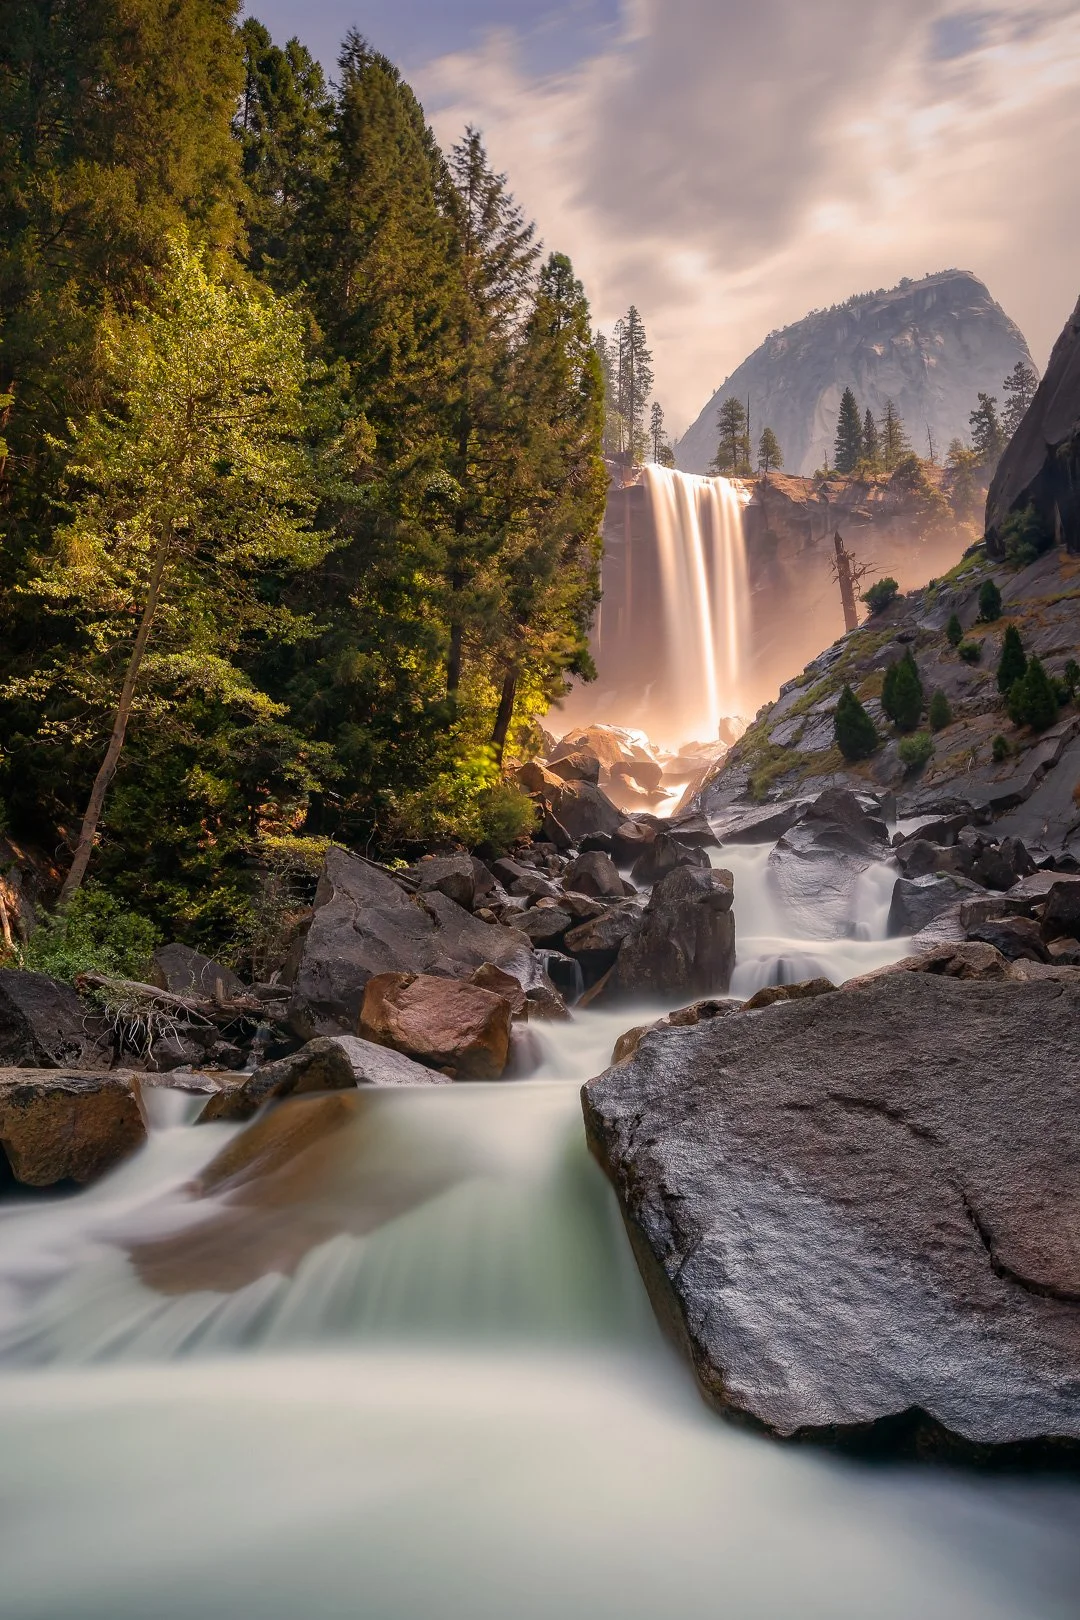
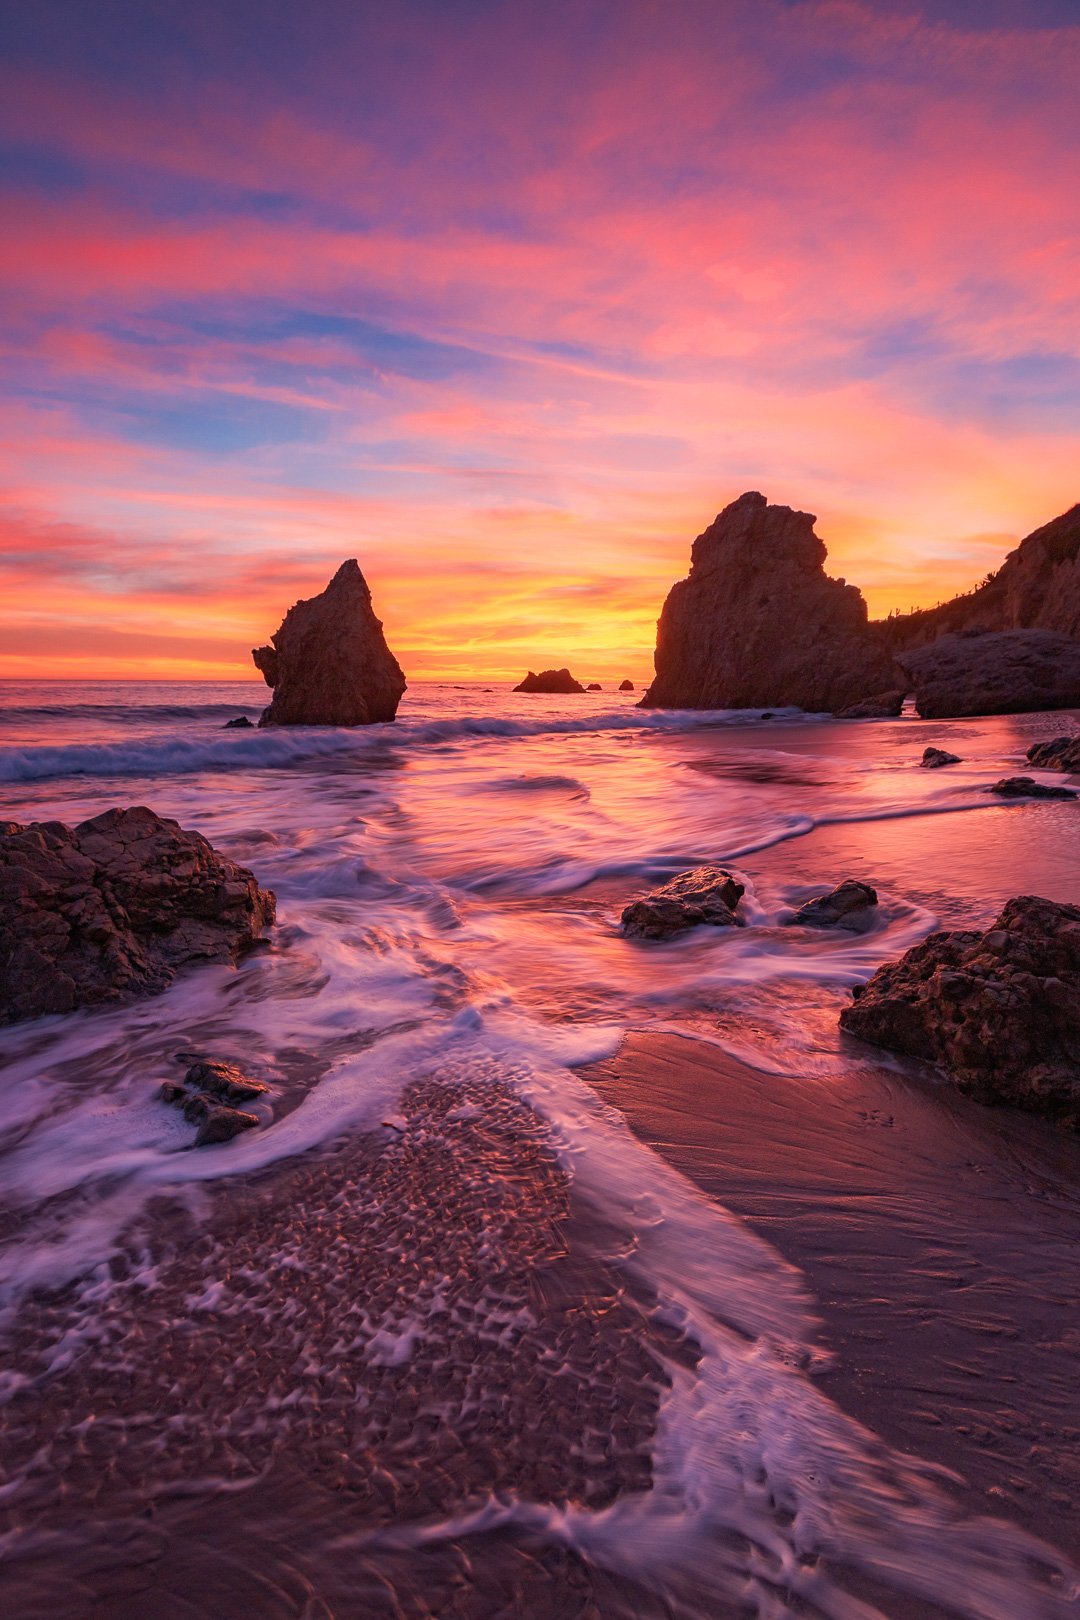
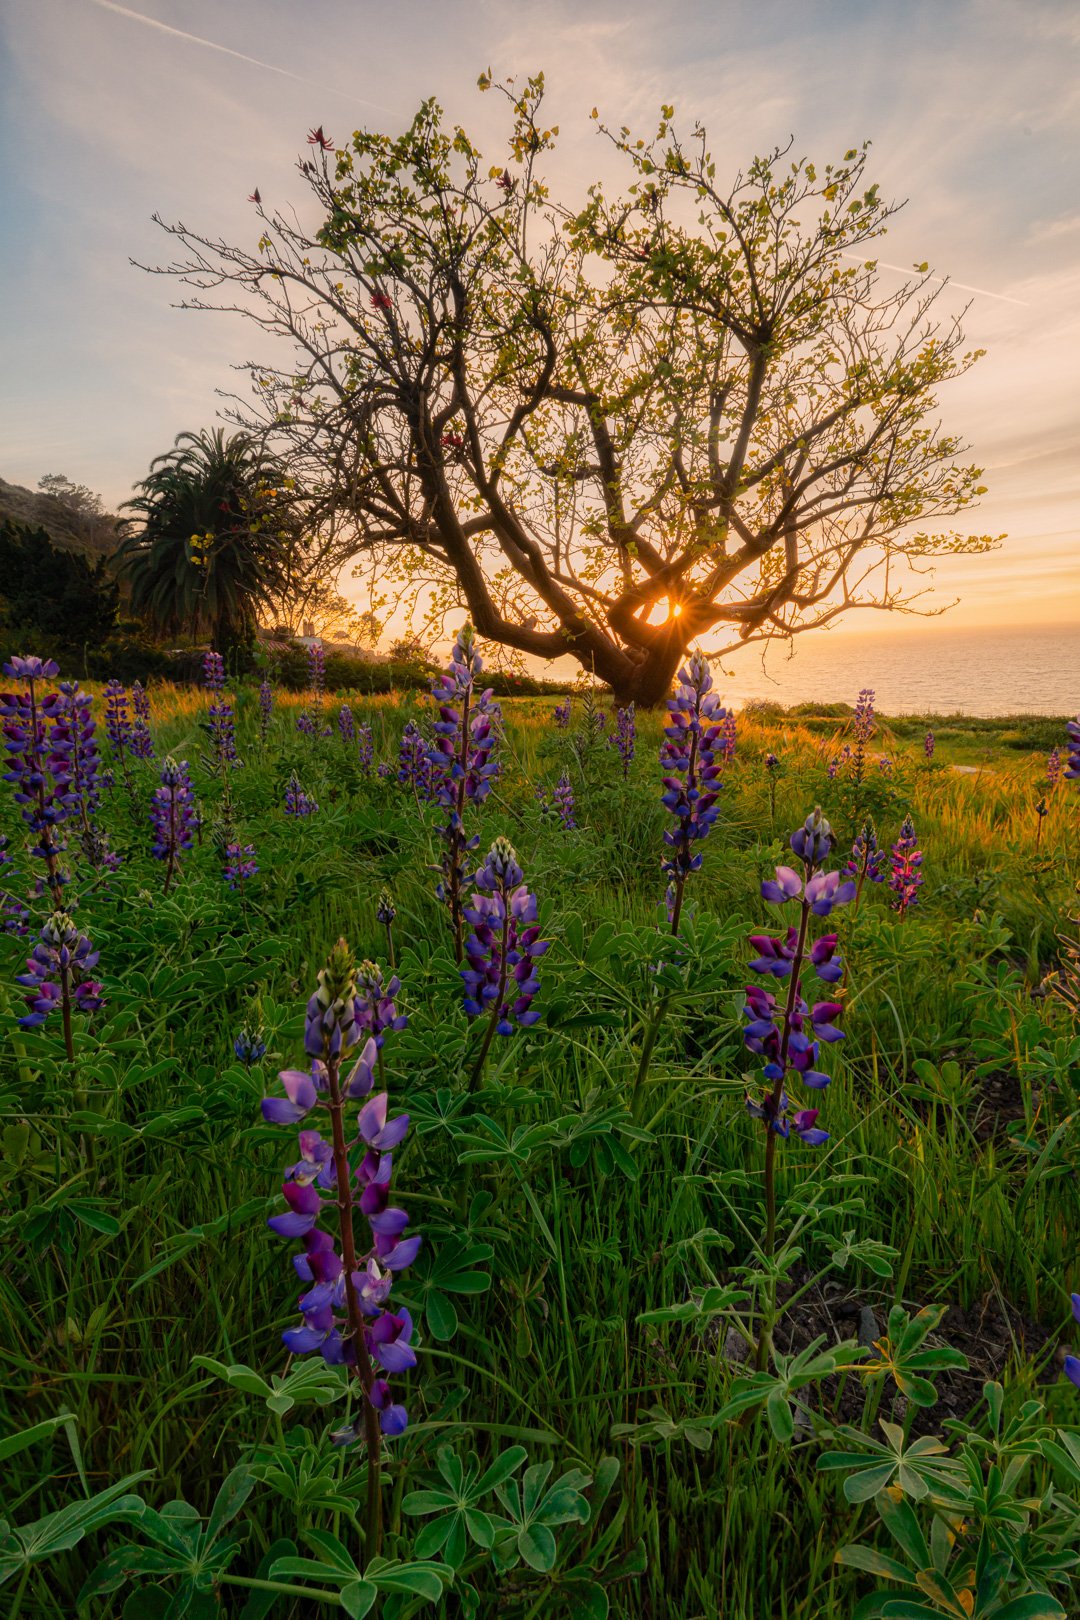
Field Tip: If your photo feels cluttered or messy, ask yourself: "Which of my three layers is fighting for attention?" Often, stepping two paces to the left, dropping your tripod lower to the ground, or zooming in slightly will eliminate the extra clutter and instantly restore balance. Typically when creating a composition I’m working to remove “distractions” or things I don’t need in the composition. I work my camera’s position until I can remove as many as possible.
Step 2: Use Color Contrast as a "Leading Line"
When photographers talk about "leading lines," they usually point to physical objects—a fence, a road, or a curving wave. But one of the most powerful (and overlooked) ways to guide a viewer’s eye is through color contrast.
Colors have inherent "visual weight" and depth characteristics:
Warm Tones (Reds, Oranges, Golds): Warm colors naturally advance toward the viewer's eye.
Cool Tones (Blues, Purples, Deep Shadows): Cool colors naturally recede into the background.
You can use this natural phenomenon to create incredible three-dimensional depth. Imagine a cool, shadowed foreground with a golden path of warm sunset light cutting through the midground. Your viewer's eye will instantly jump onto that warm ribbon of light and follow it directly through the frame.
When you pair physical leading lines with color contrast—like warm golden light hitting a rock ridge against cool ocean shadows—you build a visual map that the brain finds irresistibly pleasing. The example from Marshall’s Beach in San Francisco is a perfect example and location where you can use the warm light and cool ocean tones to create these color contrasts to lead the viewer through a scene.
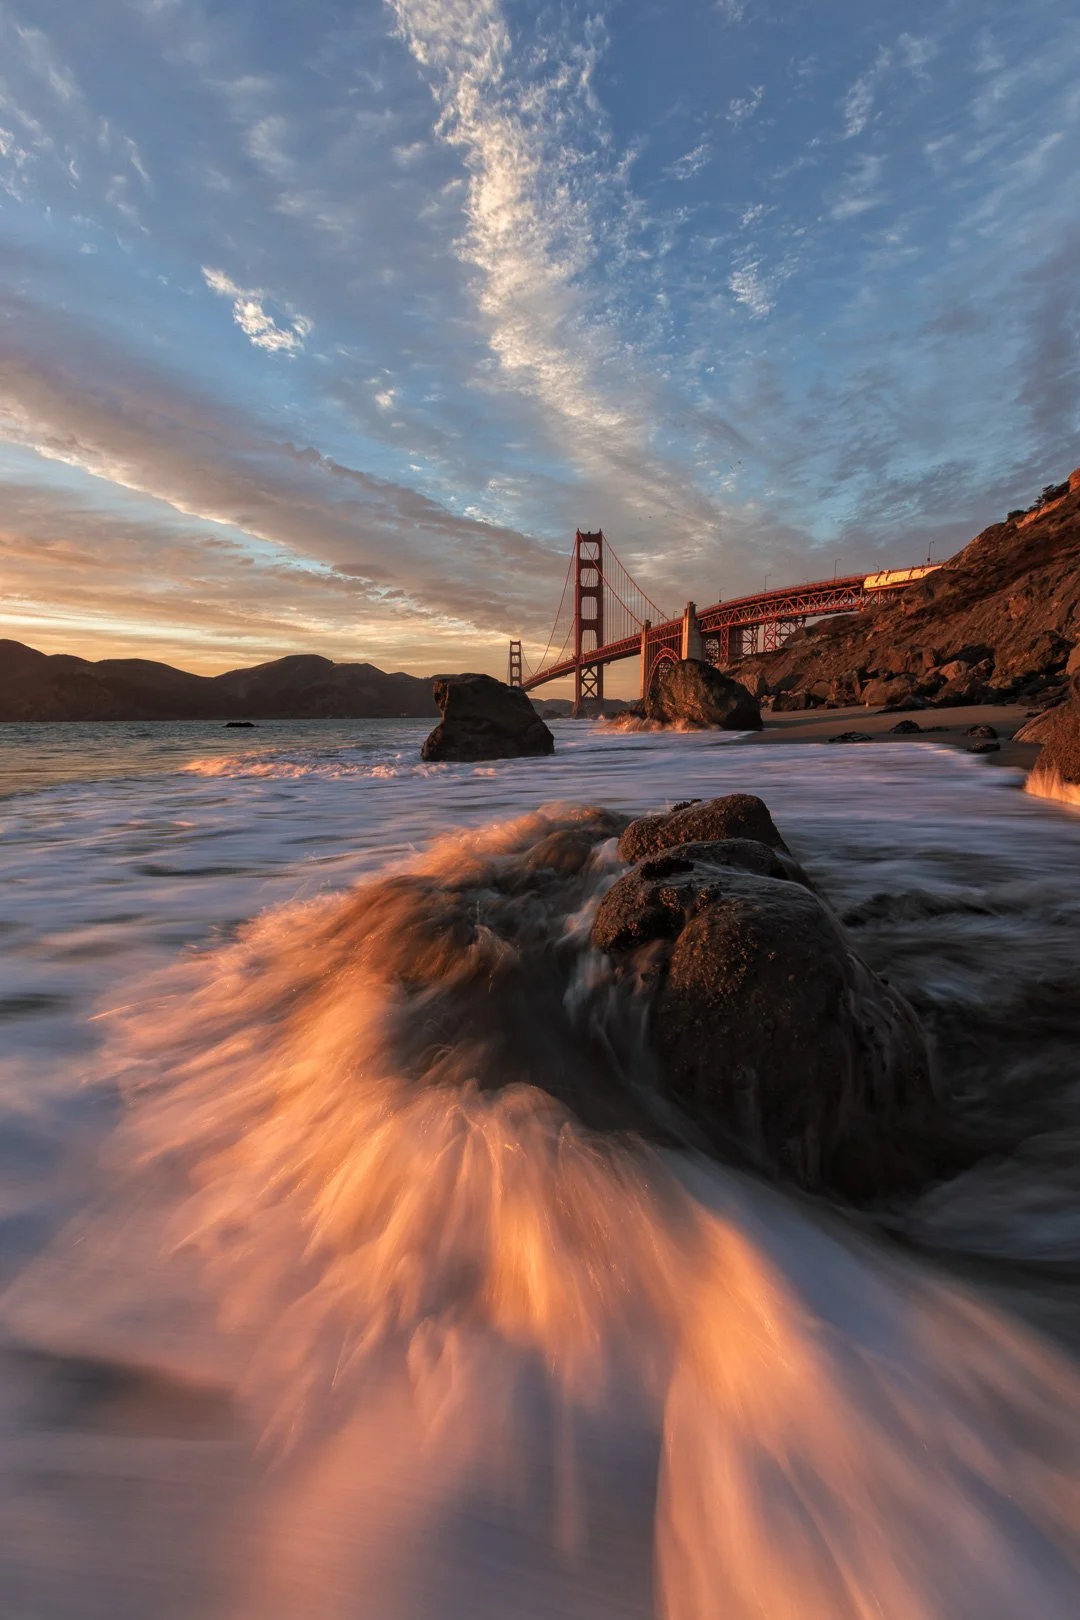
Color temperature as depth
The warm golden light catching the rushing foreground water pulls the viewer's eye strongly against the cooler blues and deep shadows of the bay, leading them straight to the Golden Gate Bridge in the midground.
Step 3: Stop Shooting in "Flat Light"
You can have a perfect foreground, midground, and sky, but if your light is flat, your photo will be too.
Harsh mid-day sun (where the light comes straight down from overhead) casts short, muddy shadows and flattens your 3-element structure into a single, lifeless plane.
To create dynamic textures and three-dimensional form, you need side-lighting or low-angle light:
Golden Hour (Low-Angle Light): When the sun sits low on the horizon, light rakes across the landscape sideways. This carves out micro-shadows along the edges of rocks, sand ripples, and foliage, instantly popping your foreground out from the background.
Overcast / Soft Light: Don't throw in the towel on cloudy days! Soft, diffused light simplifies complex scenes by removing harsh harsh glare, allowing rich natural color contrast to shine through.
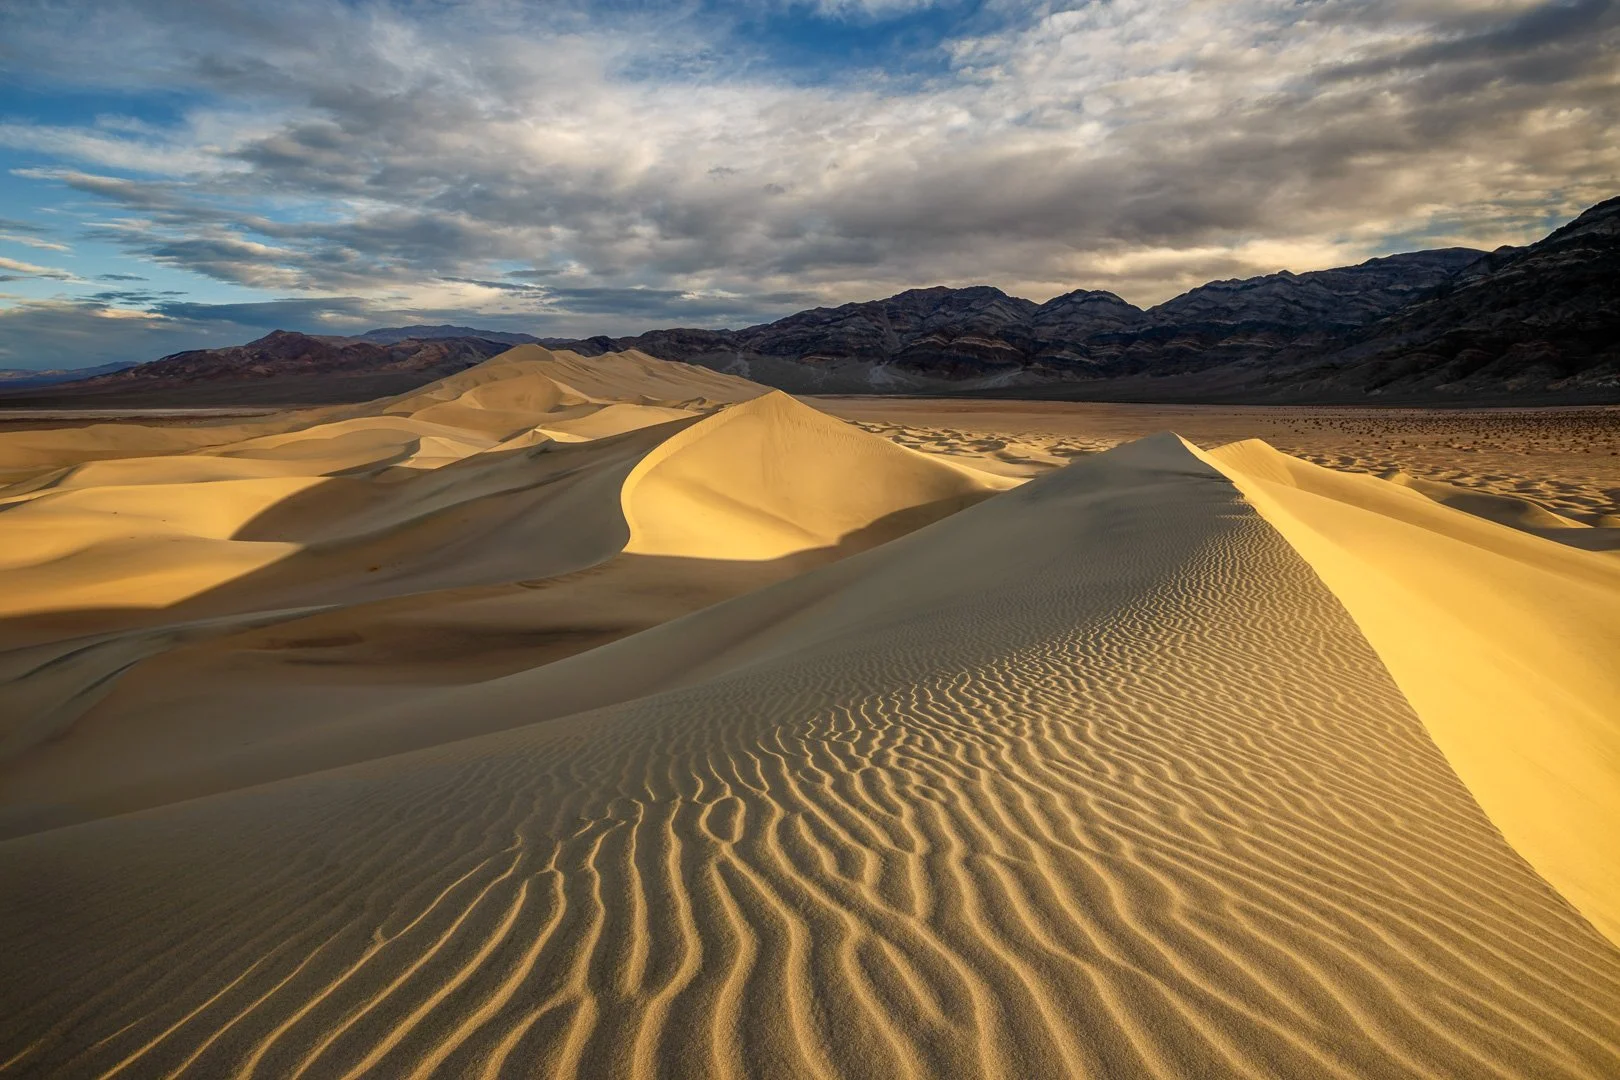
Low-Angle Side Light in Action at Death Valley Dunes: Look closely at the dramatic difference light makes. Low sunset light rakes sideways across the sand ripples in the entire foreground, carving out deep micro-shadows that give intense, almost touchable texture. Meanwhile, the stark contrast between bright, warm golden light and deep, cool blue shadow defines the massive three-dimensional form of the central dune spine. In flat overhead light, this massive landscape would appear completely lifeless and almost boring. The dunes require the golden hour side lighting to come to life.
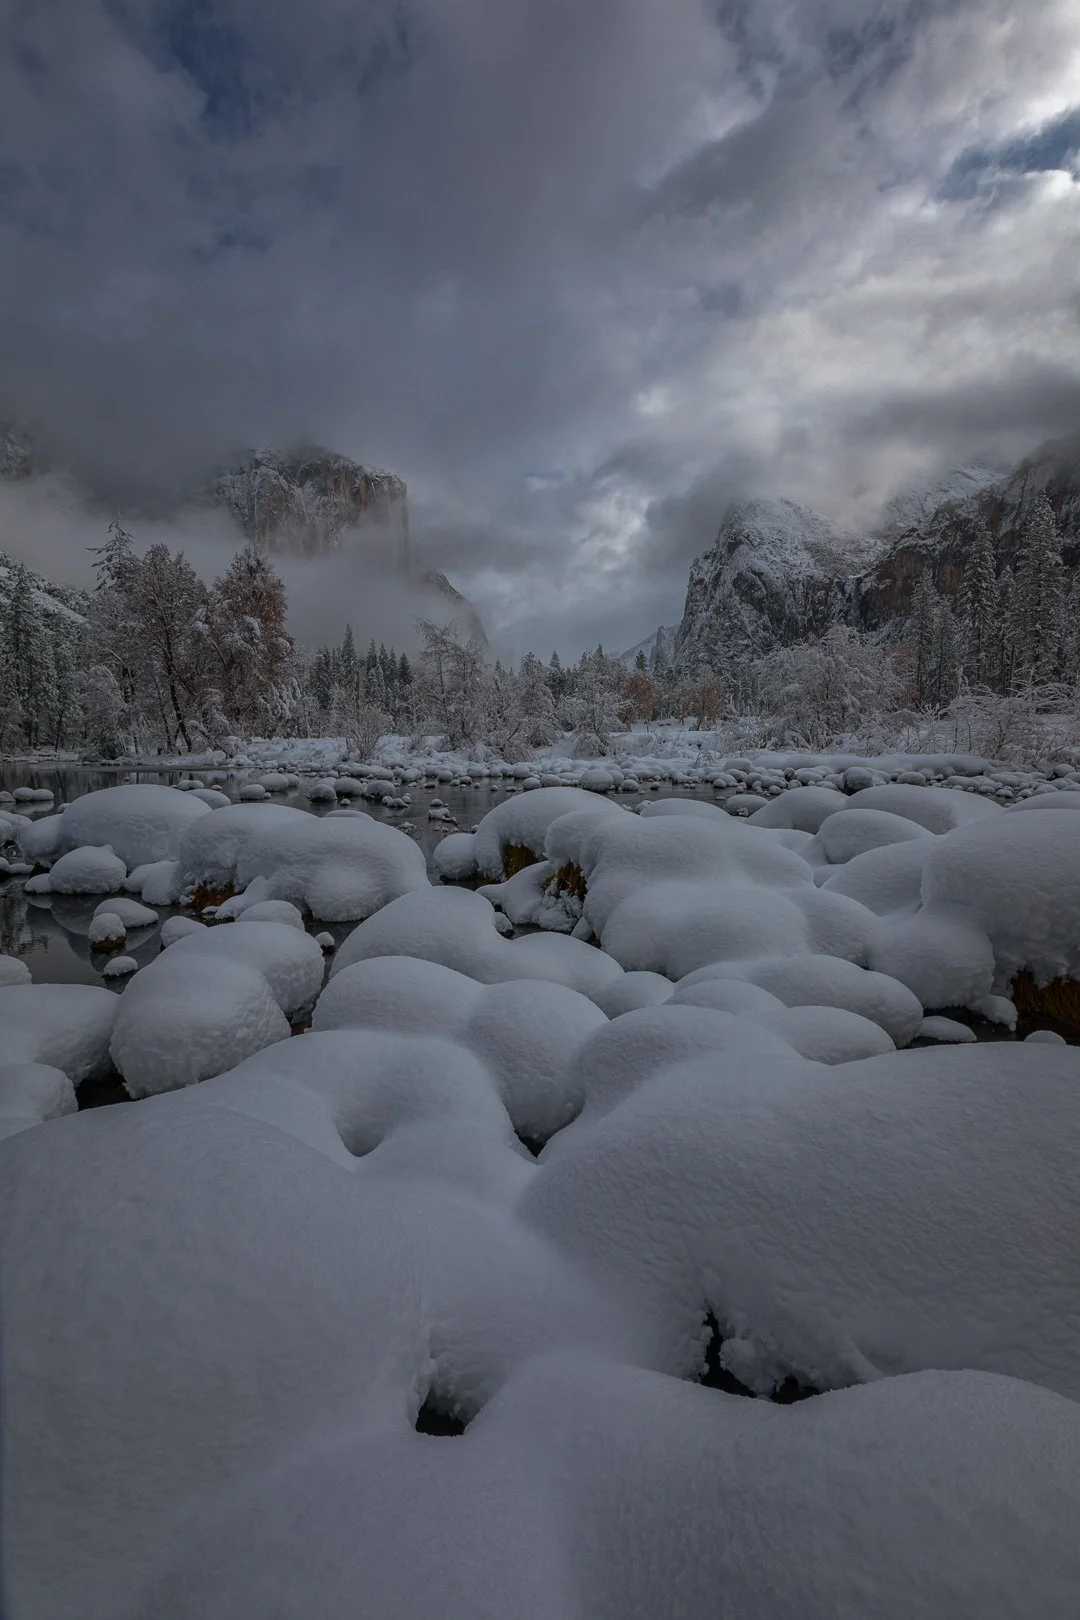
Soft Directional Light: Here, the diffused winter light in Yosemite (soft-box effect) is still directional. It subtly highlights the contours and pillowy tops of the snow boulders while creating gentle cool shadows, sculpting their form without harsh glare. Soft light can still create dimension!
💡 The "Standing Tall" Trap: The single biggest mistake I see photographers make in the field is setting up their tripod at eye level and staying there. Standing tall flattens the distance between your foreground and background. If your composition feels flat, force yourself to lower your camera to chest or knee height—it will instantly exaggerate the depth in your foreground! The two examples above are perfect demonstrations of how a low tripod setup instantly makes the small details of a scene seem grand while increasing overall depth.
The Field Checklist: Before You Click the Shutter
The next time you set up your camera in front of an epic scene, slow down for ten seconds and run through this quick composition check:
[ ] Is my foreground clear? Do I have an anchor that pulls the viewer into the frame without blocking the subject?
[ ] Are my 3 layers distinct? Can I clearly point out my foreground, midground, and background?
[ ] Where is the light coming from? Is low-angle light creating depth and micro-shadows, or is flat light killing my texture?
[ ] Is there color contrast? Am I leveraging warm vs. cool tones to direct the eye?
By simplifying the chaos of nature into three intentional layers and utilizing color temperature to guide the eye, you'll stop taking flat snapshots and start crafting powerful, fine-art compositions.
Want to Master Composition Live in the Field?
Knowing the theory is one thing—applying it when the light is changing fast in front of you is another!
📸 Private 1-on-1 Field Coaching: Work with me one-on-one to hone your creative eye, master composition, and learn how to read light in real time. Click here to book a private field coaching session.
🌊 Group Workshops & Masterclasses: Join a small group of passionate photographers for a hands-on field experience at some of the most stunning locations. Click here to view upcoming workshop dates.