Why Everything You Know About ISO is Wrong (For Astrophotography)
If you’ve spent any time learning photography, you’ve likely had one rule drilled into your head: Keep your ISO as low as possible to avoid noise. In the bright light of day, this is gospel. ISO 100 gives you the cleanest files and the most dynamic range. But when the sun goes down and the stars come out, the rules of the game change entirely.
I recently took my Canon 5D Mark IV out to a dark sky site and decided to challenge this sacred rule. I locked the camera on a tripod and shot a sequence from ISO 100 all the way to ISO 12,800 using the exact same aperture, shutter speed and focal length (f/2.8, 13 seconds, 31mm) for every single frame.
The results might shock you: The lower ISO images actually produced more noise.
The Visual Evidence: 100 to 12,800
To show you exactly what happened, I have sliced sections from each of these test shots and stacked them side-by-side. To make this comparison truly fair, I took the extremely dark low-ISO images and brightened (normalized) them in post-processing to match the exposure of the higher-ISO shots.
When you look at the comparison below, your instinct is to look at the numbers. But instead, look at the sky texture.
IMAGE 1: Wide Angle Normalized Comparison
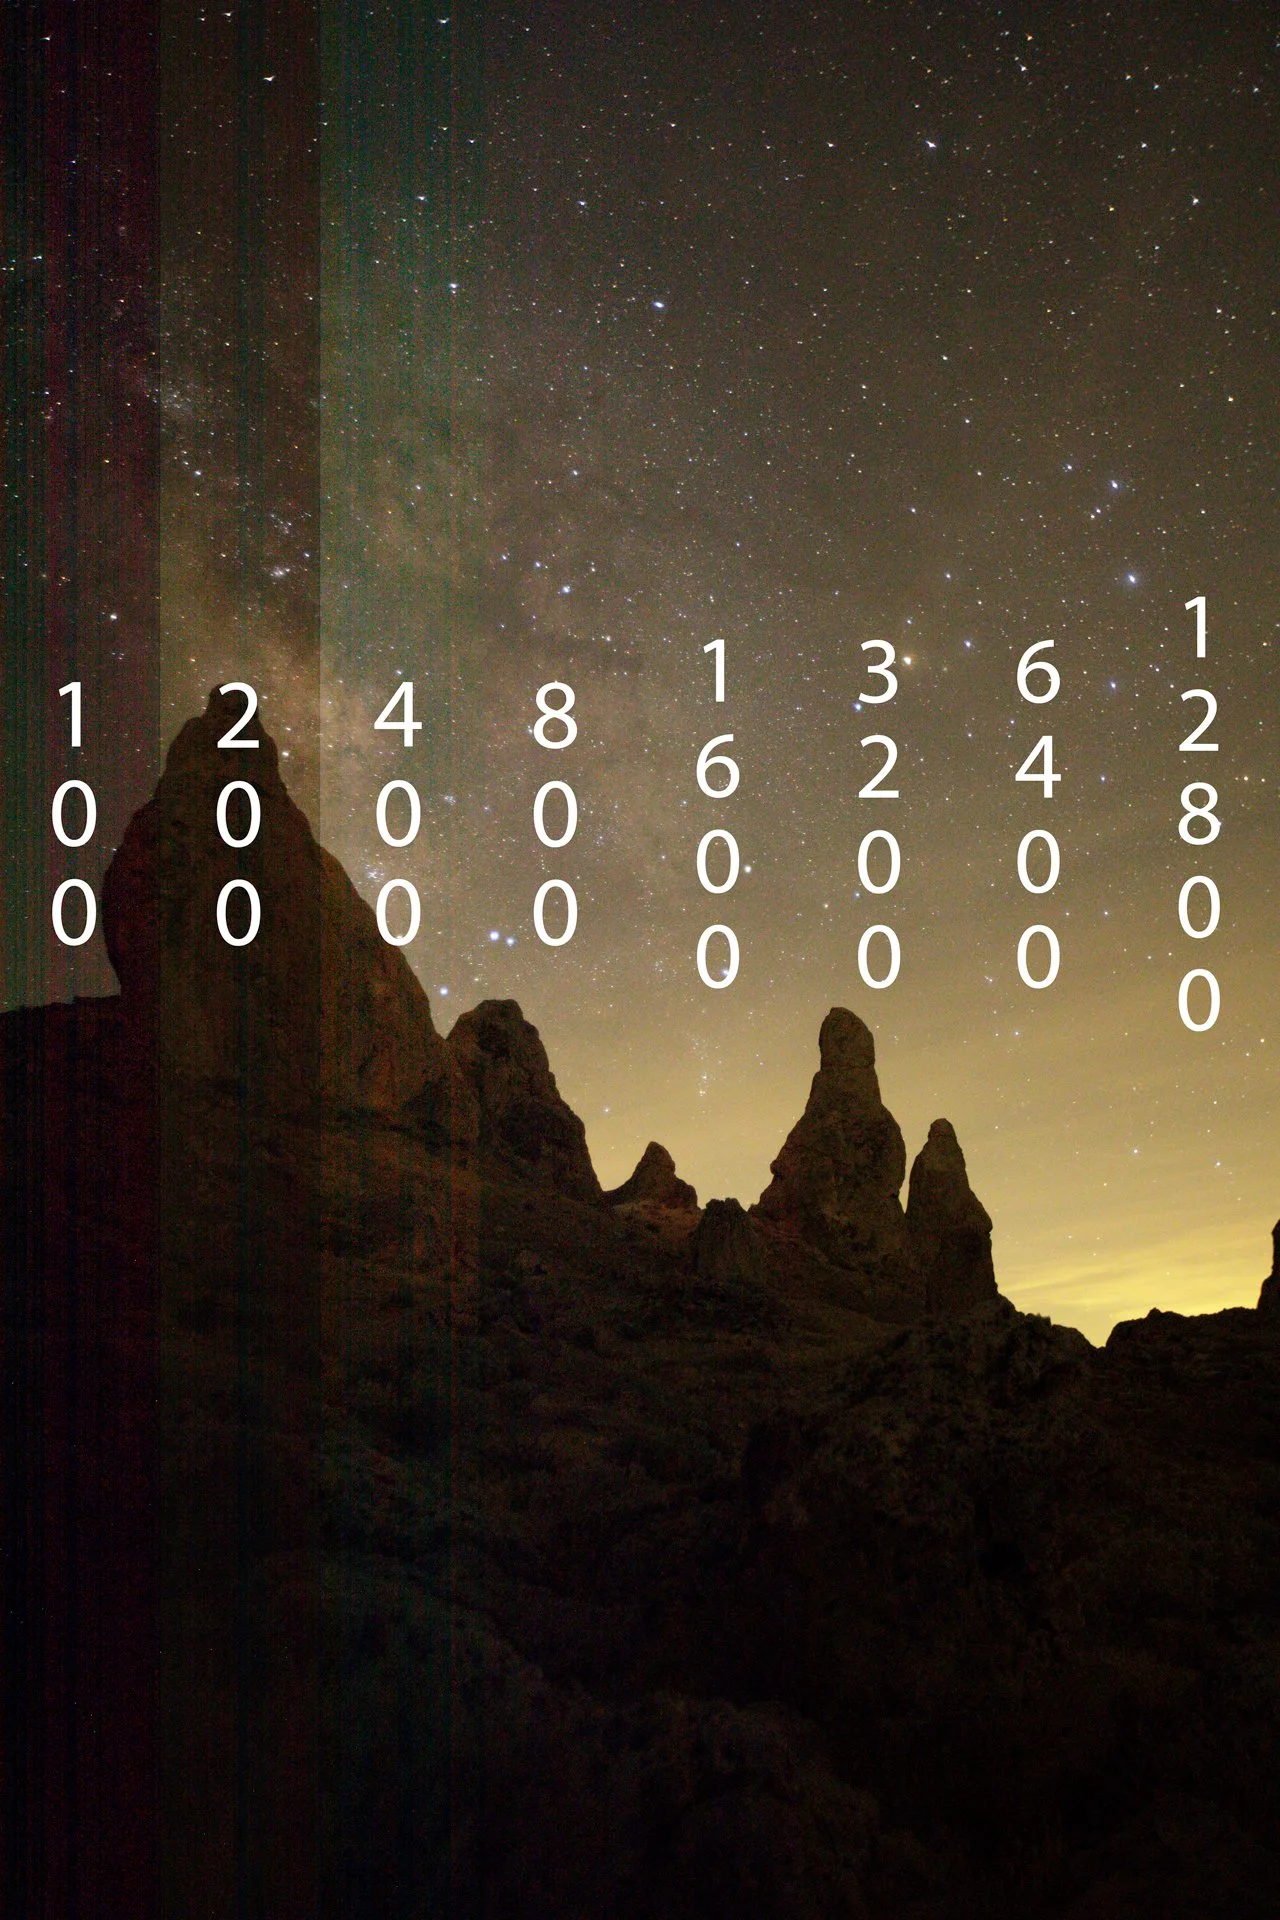
Slice of images comparing ISO 100 to 12,800 in 1 stop intervals.
You can see the progression clear as day. Look at the transition from ISO 100 to ISO 400. The Milky Way texture is buried in a wash of ugly purple and green noise and harsh vertical banding. The image looks "thin" and fragile.
Now, look at ISO 6400 on the right. Yes, there is "grain," but it is a much finer, monochromatic grain. The colors are stable, the Milky Way details are defined, and the sky looks much "healthier." The highest shot, 12,800, starts to get a bit hazy, but it is still cleaner than the pushed ISO 100 shot.
The "Volume Knob" and Your Digital Sensor
Why is ISO 100 so much worse than ISO 6400? This is the "Aha!" moment for many night photographers. It all comes down to Downstream Read Noise.
Think of ISO like the volume knob on an old stereo.
The Low-ISO Mistake (Recording a Whisper): In astrophotography, the starlight is the signal. If you shoot at ISO 100, you are recording that signal at a whisper. You lock that "whisper" into your camera file. Later, in Lightroom, you "crank the volume to 100" by increasing the exposure slider by 6 stops to see the stars. The problem is, you aren't just amplifying the stars; you are also amplifying all the intrinsic electronic "hiss" and interference created by the sensor’s hardware. This is why you get that ugly color "mud" and horizontal banding.
The High-ISO Solution (Turning up the Record Volume): When you shoot at a native ISO like 6400, you are amplifying that faint signal before it gets locked into the file. The camera applies this boost (gain) early, lifting the delicate light signal high above the "floor" of electronic read noise. The final file is written with a clean, smooth signal, which requires almost no extra brightening in post-processing.
IMAGE 2: Deep-Sky Texture Crop (The Smoking Gun)

This crop is the absolute proof. The difference in smoothness between ISO 400 and ISO 6400 is night and day. You can see the distinct vertical banding artifacts (a known quirk of the 5D IV's older sensor architecture) in the left three columns, whereas the right side is smooth and defined.
Why ISO 6400 was My Sweet Spot
For the Canon 5D Mark IV, my testing revealed that ISO 6400 was the "goldilocks" setting.
You must find the balance. While ISO 12,800 helped clear the noise, I noticed that the brightest stars were starting to lose their unique blues and oranges, clipping into pure white dots. Dynamic Range is your sacrificed currency.
At 6400, I had achieved two crucial things:
The signal was successfully lifted over the Read Noise floor (and cleared those ugly vertical bands).
The brighter colors of the stars were still preserved.
The Three Pillars of Night Noise
While my test highlights the power of ISO, it doesn't exist in a vacuum. To get that perfectly smooth ISO 6400 shot on your own camera, you need to consider these three factors:
1. Aperture: Your "Light Funnel"
ISO is a digital fix for a lack of light, but the best way to reduce noise is to get more physical light onto the sensor.
The Rule: Every stop you open your aperture (moving from f/4 to f/2.8, or f/2.8 to f/1.4) doubles the amount of light entering the camera.
The Benefit: If you use a faster lens (like a 35mm f/1.4), you can funnel so much light onto the sensor that you can drop your ISO from 6400 back down to 1600 or 3200 while maintaining the same brightness. This gives you back your dynamic range and star color without the "mud" of the low-ISO range.
The Cost: While lowering your aperture can increase the amount of physical light onto the sensor, it also will decrease your depth of field. So while lower apertures such as f/1.2 or f/1.4 will allow more light to reach the sensor, your depth of field will seriously decrease causing your foreground to appear less in focus.
2. The Thermometer Factor: Keep it Cool
Did you know your camera's temperature changes its noise profile? Sensors are electronic, and electronics generate heat.
Warm Nights: On a hot summer night, your sensor's "dark current" increases. This adds a layer of grainy, salt-and-pepper noise that even high ISO settings can’t fully mask.
Winter Advantage: This is why "Winter Milky Way" or cold-weather shooting often looks so much crisper. Lower ambient temperatures keep the sensor cool, reducing thermal noise and allowing you to push your ISO higher with much cleaner results.
Camera Cooldown: While taking long exposures your camera sensor is going to get hot. Letting the camera cooldown in between star sequences or long exposure foregrounds will help improve noise performance.
3. Different Gear, Different Rules
I shot this on a Canon 5D Mark IV, which has a very specific sensor architecture. However, technology is changing fast:
ISO Invariant Sensors: Many modern mirrorless cameras (like Sony’s R-series or Nikon’s Z-series) are "ISO Invariant." This means the noise difference between ISO 800 and 6400 might be much smaller than what you see in my 5D IV samples.
Dual Native ISO: Some newer sensors have two distinct "circuits." They might be noisy at ISO 500, but suddenly become crystal clear again at ISO 800.
Sensor Size (The Physical Limit): The physical size of your sensor dictates how much light it can actually "see."
Full-Frame: Larger sensors have larger pixels (photosites), which collect more photons and produce a higher Signal-to-Noise Ratio. This is why Full-Frame cameras generally look cleaner at high ISOs.
Crop (APS-C/Micro 4/3): Smaller sensors have less surface area. On a crop-sensor camera, you will often hit the "noise floor" much sooner, making it even more critical to find your specific camera’s "Sweet Spot" to avoid losing detail in the shadows.
Challenge: Run Your Own ISO Stress Test
Your camera is a unique tool, and the only way to truly master it is to find its "breaking point." I encourage you to recreate my experiment:
Find a dark sky and lock your camera on a tripod.
Pick an Aperture and Shutter Speed (e.g., f/2.8 at 20 seconds).
Shoot a series starting at ISO 100, doubling the ISO for every shot until you hit your camera's maximum.
The "Normalization" Test: Back at your computer, use the exposure slider in Lightroom to make the ISO 100 and ISO 400 shots look as bright as the ISO 6400 shot.
Where does the banding disappear? Where do the stars start to lose their color? Once you find that "Sweet Spot" for your specific body, you’ll never have to guess in the dark again.
The Ultimate "Noise Killer": Image Stacking
If high ISO gets your signal above the electronic noise floor, Image Stacking is what buries that noise underground forever. If you want to produce those buttery-smooth, professional-grade Milky Way shots, you shouldn't be lowering your ISO—you should be increasing your frame count.
Math vs. Noise
When you take a single shot at ISO 6400, the "noise" is random. It hits different pixels in every frame. However, the stars are "static signal"—they stay in the same place (relative to each other).
By taking 10, 20, or even 50 identical shots and using software like Sequator (Windows/Free) or Starry Landscape Stacker (Mac), the computer compares all the frames. It keeps the pixels that stay the same (the stars) and averages out the pixels that change (the random ISO noise).
The Secret: Stacking 10 images at ISO 6400 will almost always look cleaner than a single "perfect" shot at ISO 800.
How to Shoot for the Stack
Stick to your Sweet Spot: Keep your camera at ISO 6400 (or the sweet spot best for your camera).
Shoot in Bursts: Instead of one 20-second exposure, take 10 or 15 in a row with minimal intervals (time between shots). I use a remote shutter release by locking it and setting my camera mode to burst mode shooting.
Let the Software Do the Heavy Lifting: * Sequator: Great for beginners. It can automatically align the stars while keeping your landscape (like the rocks in my photo) perfectly still.
Starry Landscape Stacker: The gold standard for Mac users to get pinpoint stars and noise-free foregrounds.
Why Stacking is Better than Lowering ISO
If you lower your ISO to 400 to "save" noise, you lose the faint nebulosity and detail of the Milky Way. But if you shoot at ISO 6400 and stack, you keep all that juicy high-gain detail while the software mathematically deletes the grain.
This is the real secret of astrophotography: High ISO captures the data; Stacking cleans the data.
Conclusion
Don't be afraid of high ISO, and don't be afraid of the "Dark Side" of post-processing. Between understanding your camera body’s read noise, managing your aperture, watching the ambient temperature, and mastering image stacking, you have all the tools you need to turn a noisy night into a masterpiece.
Meet the Photographer
Chris Ewen Crosby is a landscape and astrophotographer dedicated to chasing the darkest skies and the clearest stars. With 10+ years of experience shooting landscapes and night skies, Chris specializes in finding the technical "sweet spots" that turn standard night shots into gallery-quality art. When not behind the lens, you can find Chris exploring the Western United States in search of the perfect foreground.
Ready to Capture the Cosmos?
Learning the difference between Read Noise and Signal-to-Noise ratio is one thing on a screen, but seeing it happen on your own camera back in the middle of a dark desert or mountain range is where it truly clicks.
I host Wide-Field Astrophotography Workshops designed to take you from "frustrated with noise" to "master of the night." During our time together, we cover:
In-Field Setup: Finding the "Sweet Spot" ISO for your specific camera body.
Composition: How to create awesome compositions to frame the Milky Way.
The Workflow: Capture-to-Stacking techniques using Sequator and Starry Landscape Stacker.
Advanced Gear: Seeing how trackers and fast apertures can change your game.
Whether you are a beginner or looking to refine your stacking workflow, my workshops provide a full, hands-on experience under some of the best dark skies available.